In Windows 10:
Press Win+REnter ssh pi@ your piaware local IP


To follow a file while it is being updated, you can use:
tail -f /var/log/piaware.log
Important! If you are sharing to other networks alongside Flightradar24, please disable MLAT.
When the installation is complete, please make the change in either the Raspberry Pi’s Web UI or edit the fr24feed.ini config file.
MLAT=“no”
MLAT-without-gps=“no”
ikut step ini.
sudo rm -rf LCD-show
git clone https://github.com/goodtft/LCD-show.git
chmod -R 755 LCD-show
cd LCD-show/
sudo ./LCD35-show
sudo mkdir -p /etc/X11/xorg.conf.d
sudo cp ./usr/tft35a-overlay.dtb /boot/overlays/
sudo cp ./usr/tft35a-overlay.dtb /boot/overlays/tft35a.dtbo
sudo cp -rf ./usr/99-calibration.conf-35 /etc/X11/xorg.conf.d/99-calibration.conf
sudo cp -rf ./usr/99-fbturbo.conf /usr/share/X11/xorg.conf.d/
sudo cp ./usr/cmdline.txt /boot/
sudo cp ./usr/inittab /etc/
sudo cp ./boot/config-35.txt /boot/config.txt
sudo reboot
jika nak patah balik ke hdmi....
chmod -R 755 LCD-show
cd LCD-show/
sudo ./LCD-hdmi
ini hasilnya
bagi yg mengikuti post, di bawah ini.
https://9m2zak.blogspot.com/2023/07/how-to-decode-radiosonde-weathex-wxr.html
https://9m2zak.blogspot.com/2023/07/how-to-decode-radiosonde-weathex-wxr_28.html
https://9m2zak.blogspot.com/2023/08/run-automatik-weathex-on-startup.html
kalian semua jangan risau pasal update ini. apa yang perlu dilakukan ialah :
$ mv RS RS.old
$ git clone -b test https://github.com/rs1729/RS
$ cd RS/weathex/
$ gcc weathex301d.c -lm -o weathex
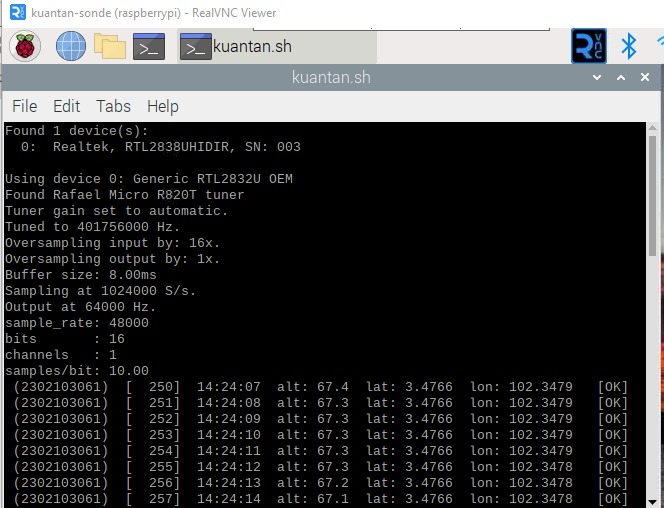
dan nanti akan keluar seperti ini. Kali ini siap dengan serial number.

Symbolic links are used to create references to files or directories in other locations
1. Navigate to wordlists directory
cd/usr/share/wordlists/
2. Create the Symlink
ln -s /path/to/original /path/to/symlink
contoh,
ln -s ~/wordlist_aku.txt /usr/share/wordlists/wordlist_baru_aku.txt
3. Verify the Symlink
ls -1
output example:
lrwxrwxrwx 1 user user 10 Aug 23 15:00 newlist.txt -> /home/user/my_wordlist.txt
If you're encountering the "NO_PUBKEY" error while working with a Raspberry Pi, you can still follow a similar process to resolve the issue. Here's how you can import the missing GPG keys on your Raspberry Pi:
1. Open a terminal on your Raspberry Pi.
sudo apt-key adv --keyserver keyserver.ubuntu.com --recv-keys 0E98404D386FA1D9
For the first key (0E98404D386FA1D9):
sudo apt-key adv --keyserver keyserver.ubuntu.com --recv-keys 0E98404D386FA1D9
For the second key (6ED0E7B82643E131):
sudo apt-key adv --keyserver keyserver.ubuntu.com --recv-keys 6ED0E7B82643E131
3. Once you've imported the keys, you can try running your package manager command again to install or update packages on your Raspberry Pi.
Buat bash script untuk KLIA dahulu. namakan klia.sh
#!/bin/bash
# Change to the desired directory
cd ~/RS/weathex
# Run your command
rtl_fm -M fm -s 64k -f 401.1M | sox -t raw -r 64k -e s -b 16 -c 1 - -r 48000 -t wav - lowpass 4000 2>/dev/null | ./weathex -b
-----------------------------------------------------------------------------------------------
make the script executable
chmod +x klia.sh
-------------------------------------------------------------------------------------
Create a Desktop Entry
sudo apt update
sudo apt install lxterminal
mkdir -p ~/.config/autostart
nano ~/.config/autostart/myscript.desktop
[Desktop Entry]
Type=Application
Exec=lxterminal --command="/home/pi/klia.sh"
Hidden=false
NoDisplay=false
X-GNOME-Autostart-enabled=true
Name[en_US]=My Script
Name=My Script
Comment[en_US]=Run myscript.sh on startup
Comment=Run myscript.sh on startup
__________________________________________________________
save dan exit. Kemudian restart. jika gagal... double check pada path dan ejaan adakah betul klia.sh ada disitu. bagi Kuantan, KB dan Bayan Lepas tu hanya perlu ganti freq sahaja.
Setup KA9Q-Radio + radiosonde_auto_rx (Airspy mini + Raspberry Pi + Docker) 1. Objektif Setup Manual ini bertu...


