Sebelum kita mulakan, pastikan chromebook anda ada tersenarai dalam list ni, jika tiada... sila beli yang ada dalam list tersebut. klik sini.
 |
| RT752TN |

acer chromebook spin 511 (R752TN, R752TN)
dalam list tersebut, ia mengatakan yang kita hanya perlu cabut batery sahaja untuk disable WP iaitu write protection. kemudian selepas batery dicabut dari CB, hidupkan CB dengan menggunakan power adapter anda dengan menekan:
(esc + refresh + power) untuk masuk ke mode recovery, paparan sebegini akan muncul.

kemudian tekan (ctrl + D)

kemudian tekan enter.....kemudian paparan ini akan muncul,

kemudian tekan (ctrl + D) Paparan seperti di bawah akan kelihatan.

tunggu sampai habis, agak lama juga kena tunggu, kemudian paparan dibawah ini akan muncul, tekan ctrl + d lagi

tekan ctrl + d sekali lagi dan kita akan masuk os cb yang baru dan isi mcm biasa segala wifi dan email sebab ianya akan diperlukan semasa nak download fw baru nanti.

setelah selesai isi semua butiran. buka browser dan tekan ctrl + alt + T dan anda akan masuk ke mode terminal.

kemudian tekan ctrl + alt + f2 ( f2 ialah anak panah kanan pada keyboard), log in sebagai chronos dan enter, kemudian taip shell dan enter
pada terminal taip,
cd; curl -LO mrchromebox.tech/firmware-util.sh && sudo bash firmware-util.sh
dan enter kemudian akan muncul,,,
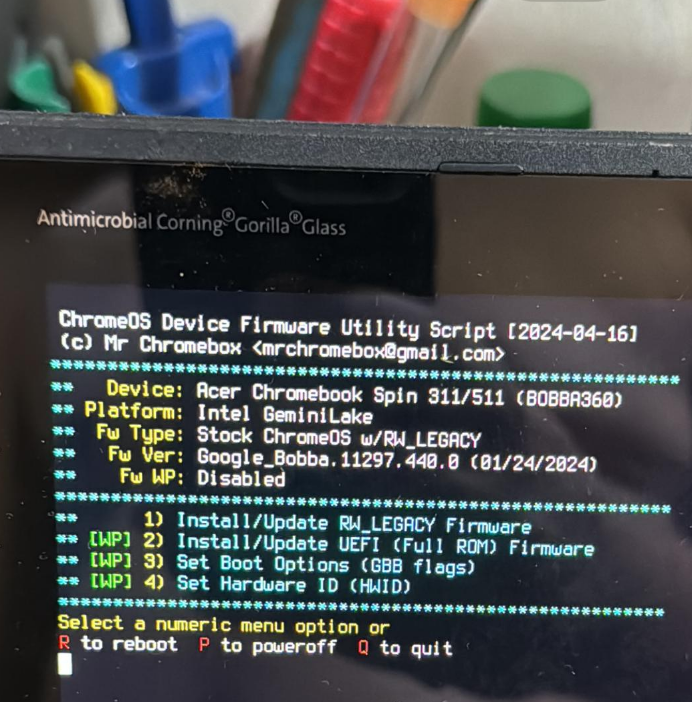
pilih no 2 dan enter tunggu hingga selesai

apabila siap, reboot dan cucuk pendrive bootable anda yang mengandungi OS linux atau window, bagi kes saya, saya masukkan raspberry pi, dan install lah mcm biasa OS tersebut.

apabila selesai install... maka...taraaaaa

semoga bermanfaat.... 9m2zak 73.